Here is a quick guide to insert checkbox in a Word document. You can use a customized bulleted list or a content control, depending upon your use.
[leaderad]
There are two easy ways to insert checkbox controls. Checkbox symbols are applied to printable documents while interactive checkbox can be checked electronically within Word document.
Here are the steps to insert checkbox in MS-Word?
• For Printable Documents
This method is only applicable to documents for printing purposes. For example, when you print the list and use a pen or pencil to mark each item, you can add checkbox controls.
- Select the list
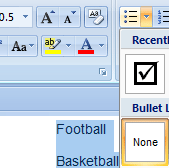
- Go to Home tab and click the Bullets dropdown in the Paragraph group. Don’t click the Bullets options as this will insert the default bullet.
- Choose Define New Bullet from the dropdown list
- Click Symbol and choose Wingdings from the Font dropdown. The checkbox will appear and you can select the check box.
• For Electronic Documents
These are the steps you need to follow to insert checkbox in MS-Word for edits to Word documents.
- The first step to create clickable check boxes is to enable the Developer tab, which is hidden by default. Right click in a blank spot on any open tab and select Customize the Ribbon.
- In the developer tab, you will see a small check box icon. Click it and a checkbox will be inserted. In Word 2007, you can find the check box under the Legacy Tools icon in the Controls Group.
- Now, when the box has been inserted, you can click it once to toggle and see whether it is checked or not. You cannot add multiple check boxes at once, and you need to follow same process every time you want to insert check box.
Do you find this article interesting? Consider subscribing to our RSS feeds and receive similar updates.


